Sitecore Mini-Guide
SPU's Sitecore Content Editor Guide
To learn or review Sitecore usage guidelines, follow the instructions below in this Sitecore Mini-Guide.
- Are you a regular Sitecore user? You may also find the Sitecore User Quick Tips helpful, which include an alternative way to publish, HTML helps, and more.
- Watch and learn: Five Sitecore Tutorials are available on the University Communications website to walk you through best practices when updating your SPU website.
- Questions or problems using Sitecore? Contact ucwebteam2@spu.edu.
Sitecore Login
Log in to Sitecore 9.0 by going to https://sitecoremaster.spu.edu/sitecore
Once at the standard SPU sign-in screen, choose your SPU account and enter your SPU password.

At the Sitecore Experience Management screen:
Select “Content Editor,” if you edit your site in the Content Editor.
Select “Experience Editor,” if you edit your site in the Page Editor (e.g., Undergraduate Admissions, Center for Career and Calling, Student Financial Services, etc.).

Navigating the File Tree
Find Sitecore files in the file tree through folder navigation. Example:
- sitecore // Content // Home // academics // school-of-health-sciences // about
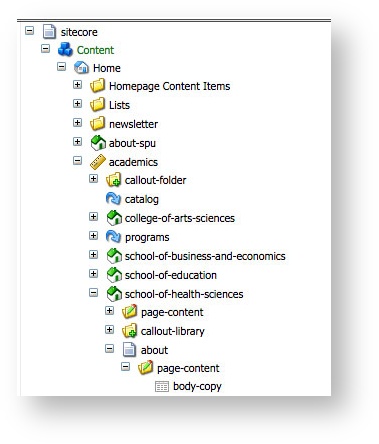
Most SPU school and departmental sites will live either in the "Academics" or "Administration" folders.
Sites built outside of Sitecore, including those built in WordPress, cannot be accessed via Sitecore.
Do not change file names in the file tree. Doing so could have disastrous consequences; if you change the path, you will break associated links.
Instead, please submit any suggested name changes to your UC communications specialist.
If you create a new page, the page name must meet the following requirements: New page names must use all lowercase letters; add hyphens between all words; and must NOT use spaces (correct: exercise-science-major).
Locating Content in the Data Template
Locate the web page that you want to edit, and click on that item in the file tree. (Longer pages typically have content under the "page-content" folder.)
Find the field with the content you wish to edit in the Data Template.

Seven Steps to Making Modifications in Sitecore
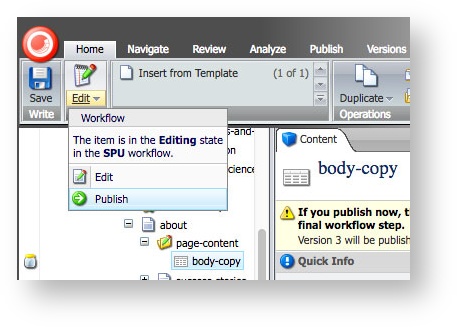
Check out by clicking "Lock and Edit."
Locate the content section you wish to edit (typically the Page Body" or "Introduction").
Click "Show Editor" above the chosen section to open the editing window.
Make all desired modification(s) and click "Accept."
Save changes by clicking the disc icon in the upper left corner.
Publish changes by clicking the "Edit" drop-down menu in the upper left corner and selecting "Publish." (Publishing will automatically check it in).
Verify your modifications in a separate browser window on the live site.
Creating a Sitecore Link (from One Sitecore Page to Another Sitecore Page)
Check out by clicking "Lock and Edit."
Click "Show Editor" above the section in which you would like to add a link.
Highlight the text you wish to link.
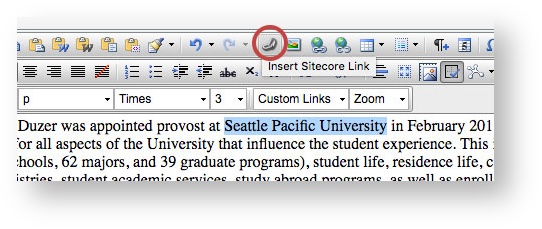
Click the "Insert Sitecore Link" button in the center of the top row of options. (The button image looks a bit like a shoe.)
When the file tree popup appears, navigate to the page to which you wish to link and select it.
Click "Link," then click "Accept."
Save changes by clicking the disc icon in the upper left corner.
Publish changes by clicking the "Edit" drop-down menu in the upper left corner and selecting "Publish." (Publishing will automatically check it in).
Creating a Link to External Content (Content Located Outside of Sitecore)
Check out by clicking "Lock and Edit."
Click "Show Editor" above the section in which you would like to add a link.
Highlight the text you wish to link and click the "Hyperlink Manager" button in the top row of options. (Note: When adding an email address, choose the "Email" tab in the hyperlink manager.)
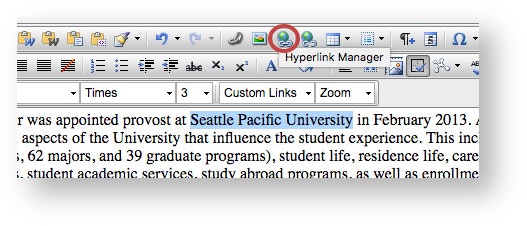
Paste the external link you wish to add into the URL field. The hyperlink manager automatically inserts "http://" into the URL field so make sure to confirm that you only have one instance of http:// preceding the URL.
Click "OK," and then click "Accept."
Save changes by clicking the disc icon in the upper left corner.
Publish changes by clicking the "Edit" drop-down menu in the upper left corner and selecting "Publish." (Publishing will automatically check it in).
Creating a Callout
In the file tree, below the your website's landing page, right-click on the "callout-library," then click on the "Insert" option.
Choose "Standard Callout," or the type of callout that best suits your content.
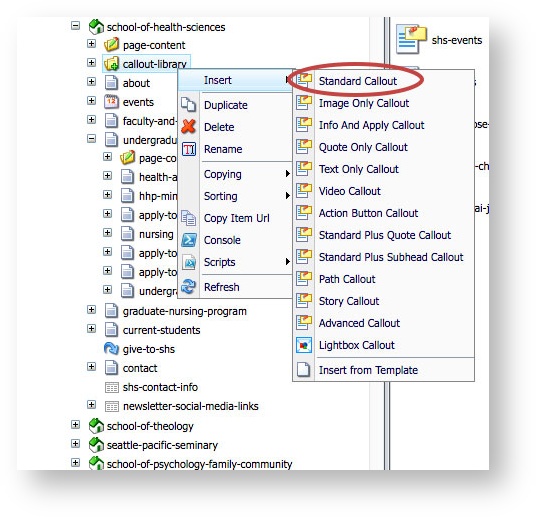
Enter the name of the new item and click "OK."
Enter the "Callout Headline" text and "Callout Body" text.
To add an image, click "Browse" above the "Image" field and choose an image from the file tree in the Media Browser.
To link the callout to a page in Sitecore, scroll down and click "Insert Link" above the LinkURL field. When the Internal Link manager pops up, choose the page to which you wish to link from the file tree and click "OK."
To add an external link, click "Insert External Link" above the LinkURL field and insert the URL into the field labeled "URL."
Save changes by clicking the disc icon in the upper left corner
Publish changes by clicking the "Edit" drop-down menu in the upper left corner and selecting "Publish."
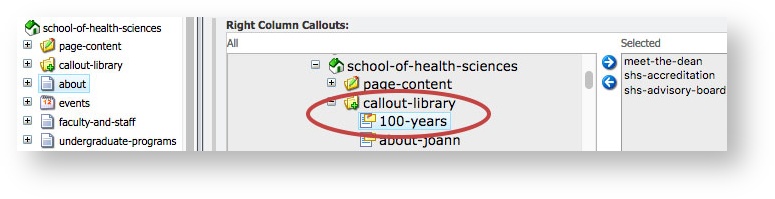
Once changes are published, return to the file tree and select the page to which you wish to add the new callout.
When the data template loads for the chosen page, scroll down to find the section labeled "Right Column Callouts.". (The "Right Column Callouts" section is a 2-column listing featuring the site tree in the left hand column.)
Use the site tree to navigate to the callout you wish to add to the page.
Double click the callout in the site tree on the left hand column to add it to the right hand column labeled "Selected."
To make the callout live, save your changes by first clicking the disc icon in the upper left corner and then publish your changes by clicking the "Edit" drop-down menu (also in the upper left corner) and selecting "Publish."
Creating a News Item
Tip: Update news items frequently to keep your site fresh.
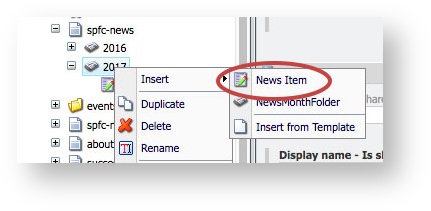
If your site has news items, they will be located in a sub-folder of the news archives page.
To add a news item, use the site tree to navigate to the appropriate year folder. Right click on the month folder and select "Insert News Item" from the drop-down menu..
Enter a file name for the news item. News item names must meet the following requirements: They must use all lowercase letters; have hyphens between all words; and must NOT use spaces (correct: exercise-science-major).
Enter the following information into your newly created news item:
Page Title – At the top of the page, add the title or headline of the news item.
News Item Title – Scroll down to the "News Item" section of the data template and add the title or headline of the news item in the "News Item Title" field.
Synopsis – Click "Show Editor" to add a short description or abstract of the news item.
Link URL (optional) – If the news item has a corresponding web page, use the link insertion options located above the LinkURL field to insert a link URL.
Release Date – Use the blue arrows in the Release Date field to select the date you wish the news item to show up on the web page.
Adding News Items to a Home Page
Once a news item is created it can be added to the home page "News and Events" section.
Navigate to the "page-content" folder beneath your home page, then click on the "news-listing" item.
In the "News Items" field you will see a small content tree on the right. Scroll down to your news section (which will be open by default) to find the article you wish to include.
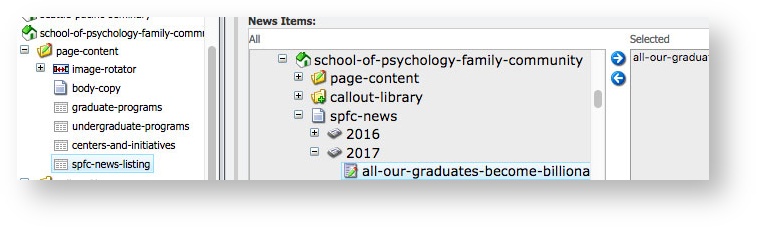
Double-click on the desired article to move it to the left column. By default it will be placed in the bottom position. Select the article on the right, then use the blue up arrow to place it higher in the list.
Once the order is set, save and publish the "News Listing" item and the article should appear on your home page.
Logging Out of Sitecore
Before you log out, click on the "Review" tab and check the "My Items Locks" (sic) section.
Click on the "My Items" icon to verify that all of your finished updates are unlocked.
If the dialog box is empty, simply click "Close," if not, click "Unlock All." When Sitecore asks you "Are you sure you want to unlock these items?" click "OK."
Lastly, close your browser tab or window and you will be successfully logged out.
Website Content Tips
Determine a plan/schedule for keeping your site’s content fresh and accurate. It works best if you assign sections of the site to specific people. If you have students who can review the site, they can offer a fresh eye and the student’s perspective.
Review web pages on a regular basis.
Key web pages, such as landing pages, should be reviewed weekly.
News items and callouts can be updated to keep the site fresh.
All other pages should be reviewed quarterly.
Verify accuracy of grammar, spelling, and punctuation on each web page.
Web content suggestions:
Content should be brief and to the point.
Web sentences and paragraphs are typically shorter than in printed material.
Bullet point lists are appropriate.
Remember that most website visitors want to scan content; they rarely want to read lengthy web content.
When linking content, link keyword(s) that make sense to the visitor. This is more effective than using the words “click here.” For example: “Visit our Seminary blog.”
UC Contacts
Your communications specialist in University Communications is your first line of contact.
If your CS is not available and you have an urgent matter, contact the web team directly at ucwebteam2@spu.edu.
Sitecore Glossary
Callout – Promotional box that highlights events, stories, new books, open houses, videos, etc. Callouts are generally located in the right-hand column of the web page.
Child Page – Sub-item of a parent page.
Content Editor – Sitecore feature where updates are made. Log in to the “Content Editor” when entering Sitecore.
Data Template – Where the content for each web page lives. The data template is viewable to the right of the File Tree. This is where you’ll insert content for web pages.
File Tree – The Windows-like file structure that houses Sitecore files such as pages, news items, lists for the directory data, and callouts.
Item – Sitecore file, which could be a web page, news item, folder, or callout.
Landing Page – Home and primary pages of a site, i.e., SPU Home, Library Home, SOT Home, SOT Seminary, SOT Undergraduate Programs.
Left-Hand Navigation – The links found in the left-hand column of the SPU website.
Parent Page – A regular page or item that can have sub-items (also called child pages).
Publish – How an update is posted to the live server in Sitecore.
Ribbon – Top portion of the Sitecore Content Editor, which houses buttons and functions to make updates.
Rich Text Editor – A special box that allows the user to enter or modify text and links without having to use programming code.
Sitecore – The name of SPU’s content management system.
User Name – What you use to login to Sitecore, the same as your Windows login.